
Welcome to Electric-Bikes.com
Charger Electric Bike - Photos and Tips
Click on photos for enlarged pictures.
The power pack is easily removed by pushing the handle/latch forward. It's a friction fit that requires about five pounds of pressure to release.
The keypad requires entry of a PIN (personal Id. number) to activate the system. Select one of five power-assist levels (0 assist through 4 times your effort). Press the red button for 2 seconds to de-activate the system.
One place to attach a rear rack is at the seatpost quick release. To fit, he left strut needs to be filed at the 10 o'clok position (when looking at the strut from the left). Assembly order when inserting the quick-release screw from the right is right strut, seat post clamp, left strut, seatpost clamp, nut.
The seat asembly is 6" tall, so the lowest seat position is 36" off the ground. That's about right for someone 5'0" tall. The highest position is 42", good for someone 6'2". Since the seat tube is only 8" deep, you may need to cut off the end of the seat post with a tube cutter.
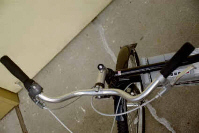
Barrel adjusters on each cable (brakes and gear shifting) make adjusting easy.
Shimano's Nexus 7-speed hub means you'll never get a bent deraileur. The brake cable can be release from the brake mechanism by pulling the brake thingy and twisting the cable clamp.
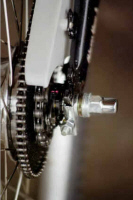
The axle restraint (with the two nuts) keeps the axle from moving (which changes the adjustment of the chains).
When the shifter is in gear '4', the red dots should align. If not, adjust the cable length. This can usually be done using the barrel adjusters at the shifter on the handlebar. Both sides have an extra washer or two to ensure the axle nuts fit tightly without jamming on the inside.
Prior to installing the rear rack, file down the edge of the left (port side) strut so it won't rub the seat tube paint when installed. Both struts are secured by the quick release - left strut in the middle of the seat clamp and right strut just to the right of the clamp (before the quick release "washer").
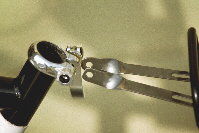
Be sure to adjust the position of the magnet (if necessary) to pass close by the sensor (within 2 mm). Click on the photo for a close-up view.
Click to return to Charger introduction.
After removing the cover panel on the left side, you'll find the battery connector circuit board (the battery, when installed, connects to this board). Mounted on the board is a 12-volt light port (as mentioned in the Shop Manual that comes with the Charger bike). Use a size N coaxial power plug (5.5mm O.D. x 2.5mm I.D.) to plug into the port. Any 12-volt headlight (and/or tail light) up to 20 watts will work. A Malibu garden light works well. When the PIN is keyed in and the Charger system powers up, this port becomes active. Put a switch on your headlight (or on the wire) to turn off the light when not needed.
Here's a report from a user in Grand Rapids, MI (December 2004):
I had this bike for a few weeks and then decided to void my warranty by doing (what else? I am an electronic engineer for over 18 years!) what I knew would void the warranty. I opened up the guts of the machine.
The circuit boards are both conformal coated (a hard protective coating on the circuit boards, either sprayed on or immersion dipped). Besides water protection, this is also very helpful to keep the surface mount components firmly attached to the circuit board (vibration can be an issue). I know my riding around town is very hard and I have had many mechanical connections come loose over a period of several weeks (mostly the aftermarket stuff I put on...Lights, Speedometer, etc.). If you are going to ride the bike and be pretty hard on it, it is probably a good idea to get some Loctite (blue) for the screws, nuts, and bolts. After I put this stuff on, I haven't had any problems.
Being an electronic engineer who designs automotive modules, I was very impressed with the amount of obvious thought that went into the design of this unit. Things like proper spacing on 120 VAC circuits, selection of a proper PCB material (FR-4, not those junk paper board materials like CEM3 or CEM1 or XXP). Fuses on high current connections (from the batteries).
In case anyone is wondering, yes the bike functions when it is cold. I haven't noticed anything going wrong with the unit. The couple of components I could identify on the circuit boards by number, are -40 to +85 C rated, which means that things like the microprocessor will function correctly at ambient temperatures of -40. I won't ride a bike at that temp!
Riding in snow absolutey sucks! I wouldn't recommend any high speed riding in snow, but I did manage to make it around town when the snow was up past the bottom of the pedals. Without electrical assisstance, I would have never made it.
The bike makes it up every nasty hill we have here in Grand Rapids and although it is not the same as having a car, the shorter commutes don't work out to all that much more time. It takes me about 12 minutes to make it to work when I used to make in about 7-10. Distance traveled is 2.9 miles up/down 3 pretty nasty hills. When I have to go downtown, it takes about 1/2 hour where I used to make it in 12-15 minutes. Distance is about 6.5 miles. However, there are other costs. My time spent on the bike versus a car payment, insurance, gas, maintenance, etc. I have already noticed the difference. I know I am saving money.
This bike rules. I don't know what type of success you'd have selling them on Ebay, but the 'junk' I've seen posted on Ebay from China is ridiculous. I had two orders cancelled on me, they claimed "battery problems". Yeah right. The other bikes I looked at were just too expnsive for my needs (i.e. e-bike and another one that was over 2 grand!).


