Welcome to Electric-Bikes.com
Electro Cycle E-4 Kit for Recumbent Bikes: Installation Instructions
Electro Cycle E-4 Kit for Recumbent Bikes: Installation Instructions

| Welcome to Electric-Bikes.comElectro Cycle E-4 Kit for Recumbent Bikes: Installation Instructions | ||||||||
| Intro | DIY Conversion Kits | E-Bikes | Folding E-Bikes | E-Bikes & the Law | |||||
|
Electro Cycle E-4 Kit for Recumbent Bikes: Installation Instructions | |||||||||
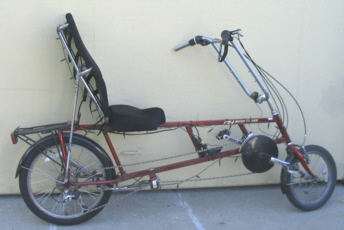
The two-wheeled EZ-1 is the most popular recumbent on the market, largely due to its excellent reputation and low price. This one (left) has been modified with black sprocket cover, rear rack and Christmas tree lights.
The three-wheeled EZ-3 (above) provides the same great features with a stable, no-balancing-required configuration.
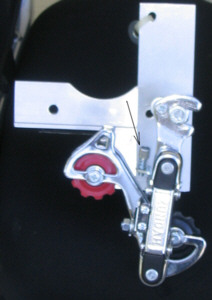
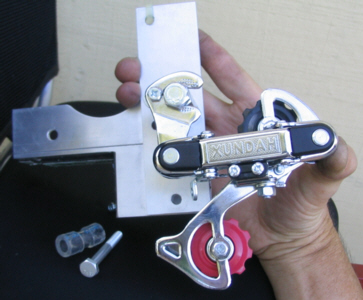
The bracket assembly includes a deraileur and cable end (arrow). The cable end is unnecessary and must be removed to do the next step.
Note the 2 washers tie-wrapped to the upper bolt hole. You'll use those later in mounting the motor to the bracket.
Remove the bolt behind the deraileur. You'll need to flex the deraileur out of the way to extract the bolt. Within the bracket and under the bike's frame is a clear plastic sleeve (shown in right photo).
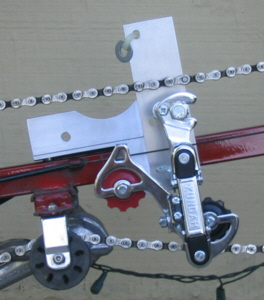
When installing the bracket, ensure that the cables running along the frame are outside the bracket where they can move easily.
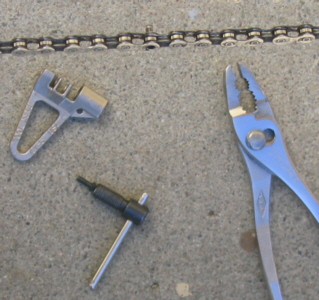
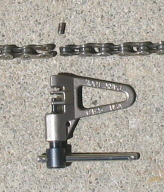
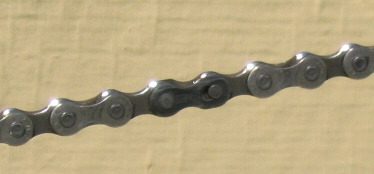
Next, the chain must be "broken" and removed. Here a Park Tools CT-5 chain tool is about to press a connecting pin out of the chain.
(Although these photos show the bracket installation before the chain removal, either way works.)
The CT-5 tool is designed to press the connecting pin only so far - to the inner edge of the outside link. At that point, I removed the "presser" and its handle from the body of the tool, so I could unscrew the tip 2 turns. When the tool is reassembled, the tip is now long enough to press the connecting pin all the way out.
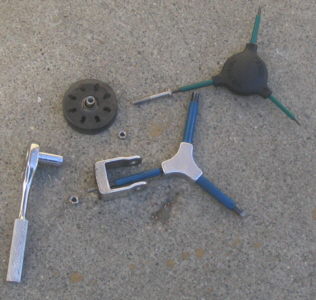
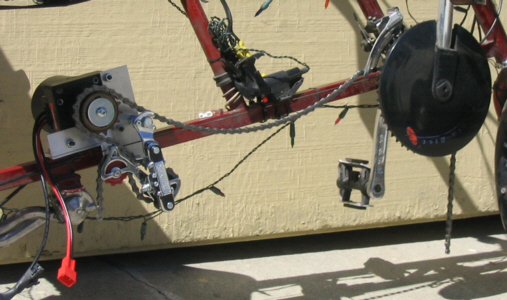
Once the chain is off, it's time to remove the idler wheel assembly. Start by removing the idler wheel using an 8mm wrench and a 3mm hex driver. Now the 4mm hex swivel bolt can be removed. If a kickstand is mounted here, remove it.
Install the E-4 bracket using the bolt and clear plastic sleeve (mentioned above). Then, replace the kickstand and bolt which holds the bracket in place.
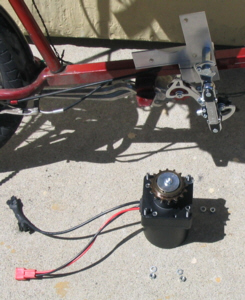
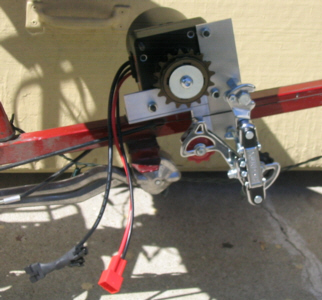
Now is the time to use those 2 washers tie-wrapped to the upper bolt hole. They go between the motor and the bracket on the upper right motor bolt. Use the three lock washers and nuts to secure the motor to the bracket. Ensure that the motor wires point to the rear of the bike/trike.
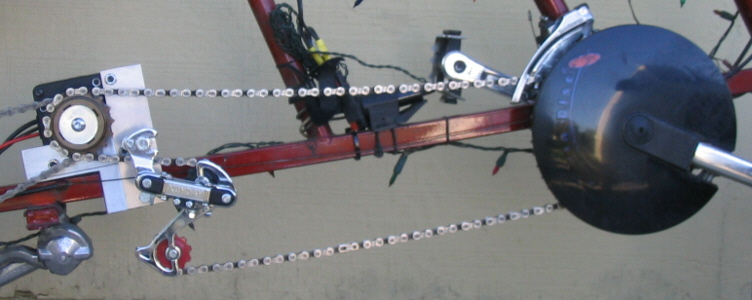
Standard gearing is 14T for the inner (with chain installed in photo below) and 16T for the outer (pedal chain).
Next, install the chains. For the EZ-1, I started with the rear one; starting with the front chain works too.
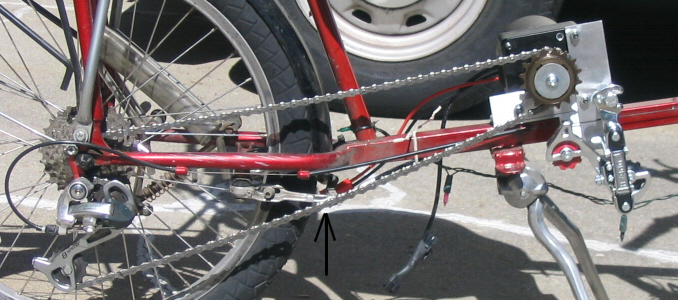
If the chain is too long, it will rub against the rear brake arm as shown in this photo (arrow). If it is too short, you won't be able to use 1st (lowest) gear.
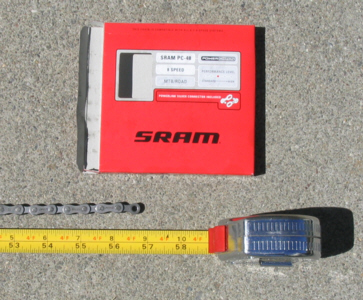
My local bike shop carried the SRAM PowerChain 8-speed MTB/Road chain with powerlink silver connector included (SRAM PC-48) for less than $20. It's 56.5" long. To fit the rear of the EZ-1, it must be shortened by 4.5" to a length of 52" without the master link. (The photo marks off 8 connecting pins in the remainer piece.)
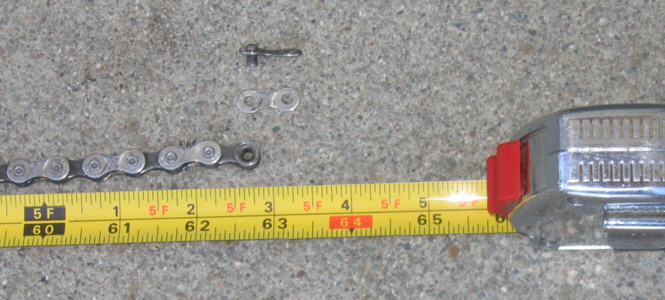
The original chain must be shortened to a length of 62.5" as shown to the right. The photo also shows parts of a link.
If you put your E-4 kit on an EZ-3, the chain measurements are different!
Here are the chain measurements for the EZ-1: 56" for the rear, 65" for the front. (For models before 2005, use 52" for the rear, 63" for the front.)
Here are the chain measurements for the EZ-3: 48.5" for the rear, 56.5" for the front. Notice that the SRAM PowerChain 8-speed MTB/Road chain fits the front without need for shortening.
Here's a proper-length rear chain in 1st (low) gear on the EZ-1. Notice that it doesn't touch the brake arm.
Here's a proper-length rear chain in 7th (high) gear.
These photos show the front chain being prepared for the "master link", the chain on the largest sprocket (above), and the chain on the smallest sprocket (left).
Here are proper-length chains on the smallest sprockets on the EZ-3.
Here are proper-length chains on the largest sprockets on the EZ-3.
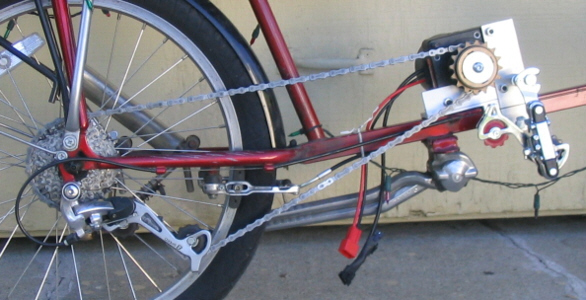
With the E-4's unique mid-drive motor assist, all 21 gears are available (with no drag) when the rider wants to pedal without (or with) the motor assist. The double sprocket on the motor shaft includes the necessary free-wheel mechanism to allow motor-only drive, pedal-only drive and combined drive.
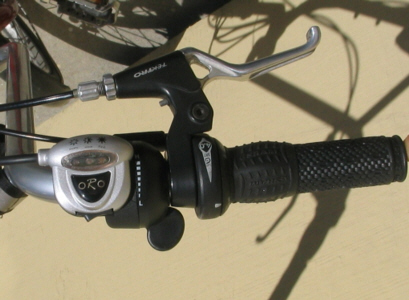
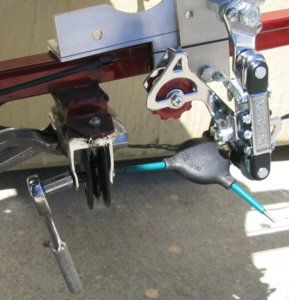
The Electro Cycle E-4 kit comes with a 1.5A 24-volt chager with industry-standard XLR connector. Also included are motor cut-off brakes which, when squeezed, immediately shut off the motor. Although these are required in some jurisdictions and desired for individuals who might not release the throttle in a panic stop, many users elect not to use them. The stock brakes that come with the EZ-1 and EZ-3 work easier with the E-4 throttle. If the cut-off brakes are used, you may want to extend the stock handlebar on the right side using a pair of short aluminum tubes - one 2.5" long that's the same diameter as the handlebar and a 5" piece to fit inside the handlebar and the short extension. With installation of the motor assembly, the EZ-1/EZ-3 idler wheel (left photo, upper right corner) is no longer needed.
These photos show the stock brake levers. On the EZ-3, the left brake lever includes a button that locks the brake - a handy feature that keeps the bike from rolling away when it's parked. The right photo shows the E-4's variable-speed thumb throttle with on/off switch and battery level indicator.
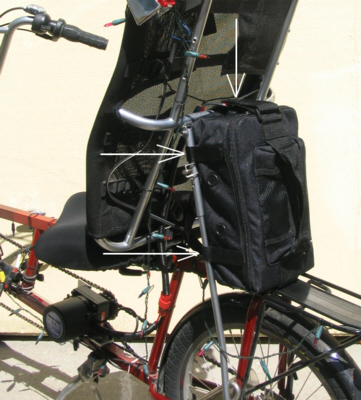
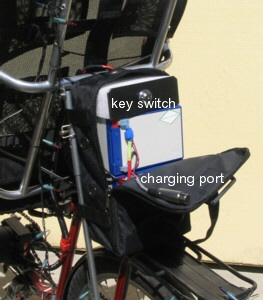
One method of mounting the battery on the EZ-1 is vertically, attached to the seat supports. The Velcro straps (indicated by the white arrows) make it easy to mount both vertically and horizontally (e.g. lying on the rack). The E-4 kit also includes a keyed switch (2 keys) and charging port.
[Editor's Note: When you get off your bike, plug the charger into the charging port; your batteries will last longer when promptly charged after each ride.]
The battery pack can be placed in a rear basket, mounted on the rear rack, or tied to the seat supports with bungee cords as shown here. The 37" rubber bungee cord hooks to the seat support (as shown by the arrow) and supports most of the battery weight. The rest is supported by the Velcro straps that are part of the battery pack. Instead of using a 19" bungee around the battery pack and seat supports (as shown here), a Velcro strap from the hardware store might work better. For the EZ-3 SX, a custom battery deck is available. (Editor's note: if you plan to use a rear rack, be sure to get the one specfically designed for the EZ-1 which is sized for a 20" wheel unlike standard bike racks sized for 26" wheels.)